DIY Wooden Wall Hooks with Nordic Flair
Ever stood in your hallway staring at a tangle of coats, bags, and scarves, thinking there must be a better way to organise it all? You’re not alone. But instead of heading straight to a big-box store, why not turn the solution into something that also adds warmth and charm to your space? Enter: DIY wooden wall hooks — the perfect balance of form and function, inspired by Scandinavian simplicity.
Scandi interiors are known for their clean lines, practical beauty, and natural materials. A well-placed set of Scandi wall hooks ticks all those boxes — and creating them yourself adds a personal touch you’ll appreciate every time you hang up your coat. Whether you’re crafting for a compact flat or a spacious entryway, this minimalist DIY will bring subtle style and serious function to your home.
In this post, you’ll get a full walkthrough of a wood decor project that’s achievable for all skill levels, eco-conscious, and stylishly Scandinavian. Along the way, we’ll share real-life inspiration, pro tips, and simple tricks to make your DIY both easy and rewarding.
Why Wall Hooks Are a Scandinavian Favourite
Form Meets Function
Scandinavian design never adds clutter for the sake of decoration. Instead, it celebrates useful objects that also look beautiful. Wall hooks are a great example — they’re everyday items turned into small statements of intention and calm.
Here’s why they’re so popular in Nordic homes:
- They make use of vertical space, ideal for compact interiors.
- They support daily routines — everything has its place.
- They bring natural materials (like wood) into high-touch areas.
- They’re simple, tactile, and timeless — no bells or whistles.
Materials You’ll Need
One of the best parts of this project? You likely have a few of these items lying around already. Keep it simple, and choose sustainably where possible.
Basic Supplies
- Wooden dowel or scrap timber (oak, pine, or beech are great for a Scandi finish)
- Saw (hand saw or mitre saw)
- Drill and drill bits
- Sandpaper (80, 120, and 240 grit)
- Wood glue (optional, for extra stability)
- Wall plugs and screws
- Clear matte wood oil or beeswax (for a natural finish)
- Pencil and measuring tape
Optional:
- Wood stain (keep it light or natural — think ‘Nordic forest’ vibes)
- Brass caps or leather accents for a touch of personality
Sustainability Tip: Reuse offcuts or repurpose old furniture legs. This keeps waste down and adds extra story to your hooks.
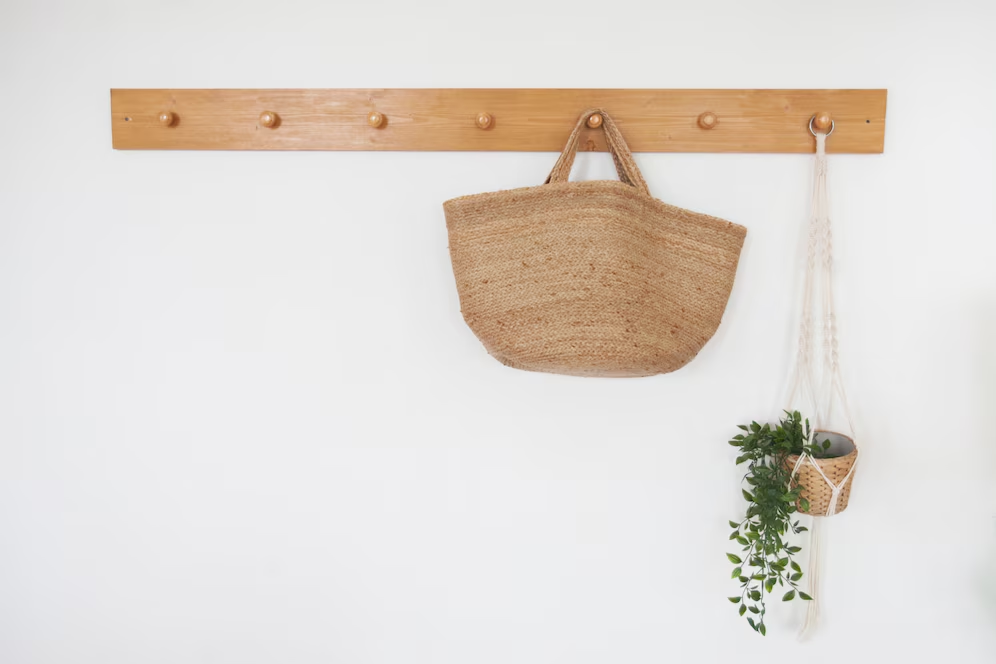
DIY Scandi Wall Hooks
Choose Your Design Style
Scandinavian style thrives on simplicity, but there’s room for variation. Choose a look that suits your space:
- Cylindrical peg hooks (cut from dowels, clean and minimal)
- Angled block hooks (small cubes cut on a diagonal — geometric and chic)
- Flat plank hooks with round pegs (a traditional yet modern approach)
Think about what you’ll use the hooks for — coats, keys, towels? This helps decide sizing and placement.
Cut the Wood

- Cylindrical Pegs: Cut dowel into 8–12cm lengths
- Block Hooks: Cut timber into squares or rectangles (approx. 4x4cm or 4x6cm), then bevel if desired
- Plank & Peg: Cut a base plank to your desired length (e.g. 40cm for three hooks), and attach smaller dowel pieces
Make sure each piece is consistent in length and shape for a tidy look. Use a mitre box or guide if needed.
Sand Until Silky
Start with 80 grit to remove splinters, then move to 120 and finish with 240. Pay special attention to:
- Edges and corners – keep them soft
- The back – especially if it’s going directly against the wall
- Any drilled or cut areas – you want smooth finishes for comfort
Scandi Detail: Don’t over-sand to perfection. Slight imperfections add warmth and character — hallmarks of handmade Nordic charm.
Drill Your Mounting Holes
- Measure and mark the back of each hook.
- Use a drill bit just larger than your screw head.
- Create a pilot hole in the wall or base plank first, then fix each hook with a screw from behind (or through the wall if mounting individually).
If you prefer invisible mounts, use keyhole hangers or threaded inserts to hide hardware. Just be sure they’re secure — especially for coat hooks.
Apply a Natural Finish
Seal your hooks with:
- Beeswax – for a soft sheen and tactile feel
- Linseed or tung oil – for subtle colour enhancement
- Clear matte polyurethane – for high-moisture areas (e.g. bathrooms)
- Optional stain – keep it light and transparent for that classic Nordic look
Apply with a lint-free cloth, allow to soak, and buff gently. Let dry completely before use.
Creative Variations to Try
Want to add a personal spin? Scandinavian doesn’t mean boring — it means intentional. Here are a few tweaks to make your hooks unique:
Mix Materials
- Add leather loops for hanging scarves or bags
- Cap your pegs with brass or copper disks
- Use ceramic or concrete bases for an earthy contrast
Play With Layout
- Mount three pegs in a straight line for entryway minimalism
- Create a staggered, asymmetrical row above a bench
- Arrange a tight cluster in a child’s room — at their height!
Add a Shelf
- Install hooks beneath a floating shelf for double function
- Great for entryways, bathrooms, or tiny flats
Real-Life Inspiration: Sofie’s Micro-Mudroom
Sofie, a product designer from Copenhagen, turned a narrow hallway corner into a sleek mudroom using six handmade hooks.
“I used leftover oak dowel and beeswax,” she explains. “Each hook is slightly different in length — it wasn’t planned, but now it looks intentional. They hold jackets, keys, even a tote with our dog’s lead.”
With a woven bench and a cork mat below, she created a functional zone in just 90cm of wall space.
The Scandinavian Mindset: Why DIY Wall Hooks Make Sense
This project is more than just an aesthetic upgrade. It embodies key values of Nordic design culture:
- Self-sufficiency – Making it yourself connects you to your space
- Simplicity – You only create what you need
- Sustainability – Less mass production, more intentional use of materials
- Mindfulness – Crafting is soothing and fulfilling
Whether you’re a seasoned maker or a DIY beginner, this project gives you a chance to engage with your home in a meaningful way.
Tips for First-Time Woodworkers

Nervous about picking up a saw? Here’s some encouragement:
- Start with pre-cut dowels or have wood cut to size at your local hardware shop
- Use fine sandpaper to smooth mistakes — it’s forgiving
- Watch a quick tutorial on drilling clean pilot holes (YouTube is your friend)
- Practice on scrap wood before committing
The beauty of minimalist DIY is that simplicity is the goal — not perfection.
Where to Buy Sustainable Materials
Look for FSC-certified, reclaimed, or local wood sources. Some top UK/EU suppliers include:
- SL Hardwoods – For oak, beech, and dowels
- Woodshop Direct – Custom-cut hardwoods
- Eco Timber – Sustainable and reclaimed materials
- The Good Trade/Etsy – Leather scraps and waxes for finishing touches
A Small Project With Lasting Impact
Scandi wall hooks might seem like a small detail — but they’re exactly the kind of thoughtful, everyday item that Scandinavian design champions. With a few basic tools, a slice of wood, and a little care, you can create something that’s useful, beautiful, and personal.
By leaning into minimalist DIY, you’re not just making hooks — you’re curating your space. You’re slowing down, crafting with purpose, and embracing a design philosophy rooted in intention, not excess.
So what will you hang first? A linen tote? A wool scarf? Or maybe your favourite weekend jumper?


